
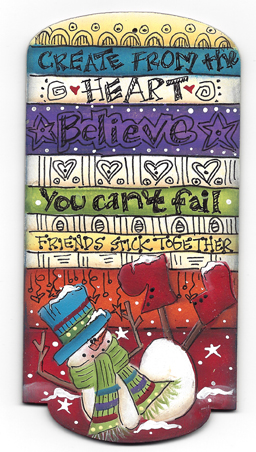
Can’t Fail Doodle Banner Ornament
Here is your Can’t Fail Doodle pdf – It contains the supply list, photo and instructions.
The lessons are divided into smaller segments so you can easily find topics. I recommend that you watch the lessons in numerical order so you can see the lesson from start to finish. Of course, you can always go back and watch them over as many times as you need to in order to grasp the skill being demonstrated. The time it will take to watch each video varies from lesson to lesson, and is shown in parenthesis () after each video link.
It is recommended that you let the video load completely in the browser window before you attempt to play it. Be patient, this may take a few minutes. It will depend on the speed of your computer and the speed of your internet connection.
NOTE: To view each video, click on the links below. The video will open in a new window. Close the window to return to this page.
Video 1: (5:38)
Video 2: (5:23)
Video 3: (4:22)
Video 4: (10:11)
For today’s project you will want to view the videos and practice some lettering.
Then use the pattern/pdf and start to design your mini banner ornament on paper. You can use the stripes basecoat stencil to help base your sections or you can put them in by hand. Combine sections together to create wider shapes.


Create colored sections.

Shade the sections to make them stand out more and create depth.
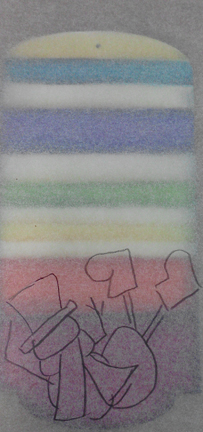
Use the photo in the pdf as your pattern for the snowman shape. Test out the snowman design using tissue tracing paper. Slip white transfer paper underneath and transfer the design.

Once you have the design on the surface take your time and get a good basecoat of color in the sections.

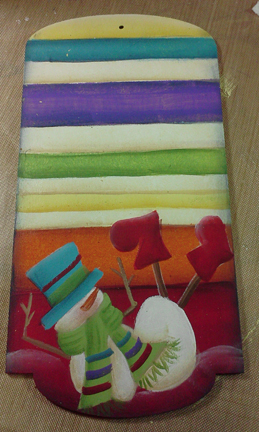
Add detail to the hat and scarf. Once you are done with that, you can start adding your design in the individual sections. Use the color photo as a guide or come up with your own. Add and embellish with dots and ink as desired.
Question of the Day:
How could you use this kind of project for every day themes?
